Saturday, September 4, 2010
NEW WEBSITE AND NEW STORE!!!!!!
Ok everyone. As promised I have been really hard at work doing my usual research and development and the fruits of my labors have been BORN!!!! BEHOLD! http://www.darkproductionsllc.com has risen from the ashes to bring you the finest pieces I have created to date. But wait there is more......we are up and running on Etsy.com as well. The site is http://www.etsy.com/shop/DarkProductionsLLC. Come shop and see what we have to offer!
Tuesday, July 13, 2010
No I am not dead
Good afternoon,
Rumors of my death have been greatly exaggerated. Currently I am in the process of working up some new content for my website PLUS some of my previously hands off stuff has become un-classified so new content up soon.
~Newsome
Saturday, June 12, 2010
Things to come
I gave a speech a few days ago to a high school stagecraft class. It was a unique experience as I don't normally speak to large groups. Anyway, as most of you know I have a back injury so the updates have been a little spotty at best BUT i am cleared to work some now so I am planning the website and beginning the BUSTER!!!! I can't wait because I have figured out ways to make it electronic as well as animated. If my plan works out I should be able to make it vibrate (charging), pop up heat vents, and light up. It will be a few weeks but I will try and keep everyone posted.
~Newsome
Friday, June 4, 2010
OH yea this is SOOOOO SEXY!!!!
So I know I have been out for a while with the back thing and just today I found that I am going to have to do EVEN more but I had to do something today so I put one of the last finishing touches on NIMH. Yes I named the bike and to hell with you if you don't like it. My next treatment is gonna be a Light bike motif to honor the new upcoming TRON movie.

This is the front of him so far. The shield is going to be repainted due to personal belief changes.

This is his side and believe me it looks and feels just as sexy as the picture. Last but not least; two things. Here is the tank detail----

ANNNNDDDDD..... I am in the process of switching insurance companies because my current one sucks. I was attempting to get the bike on the same insurance as my house, truck, car, etc... so my policy and payment would be lower and I found out that I own one of the top FIVE bikes that insurance companies hate to insure because of the types of people who own them! That is amazing and awesome as well as expensive but ah well.......totally worth it.
Friday, May 28, 2010
Sorry
Post will be updated tomorrow as I have just gotten done with PT and have an urgent meeting to attend to.
Friday, May 21, 2010
THE TANK OF DOOOM!!!
This is not, in fact, The egg part two as I promised because in between then and now I have managed to end up in physical therapy. Thus I defaulted to my ongoing project which was my website and getting advertising so that I can bring my evil creations to the masses (insert evil laugh here!)
This brings me to the topic of turning my bike (Cbr 954) into my own two wheeled advertising whore. This is what he/she/whatever looked like when I bought it.

After a really nasty wreck about a year ago it ended up with about $4000.00 in damage to the fairings (the plastic stuff for those of you that don't ride) and a hefty E.R. bill for me because I wasn't wearing a lid. I know I know I am an idiot shut up! This was what it looked like when it returned to the shop.

Anyway after re-habbing and avoiding it for two months I finally decided to resurrect N.I.M.H (Yes I named it and it stands for the National Institute for Mental Health which is where I should be because I have done 185 M.P.H on it........allegedly. ) Resurrecting meant painting it because I only had enough cash to repair the major working and not the facia. So three tube of Epoxy and A LOT of Bond-o later I decided to paint it my style which meant......blood-stained and black....LIKE MY SOUL AHAHAHAHAHAHAH! Which promptly made it look like this.

This made me so happy and was incredibly easy to paint. Fabricator point of order.....buy sherwin williams automotive. They have come out with some amazing low V.O.C stuff for automotive paint and it is amazing. I bought PPG originally and the black base coat cost me 80 bucks. It promptly cracked and ran like a scalded ape all over the fairings. I bought the S&W stuff and it cost me 6o for red, white, black, and blue. It went on and I still have some left over.
Currently I decided to put my Dark Productions Logo on the bike so that people will know who did it so what better place to put it than.......THE TANK!!! Thus I primed it.

Once I primed with standard rattle can primer from Lowes. I automotived it to a sexy black. WARNING: Automotive paint is some really nasty stuff so if you decide to use the stuff please please please wear a respirator! This is how the black turned out.

From there I had to design the logo for Dark Productions and send it off to Fastsigns to get it printed in vinyl.

For those of you who are thinking about starting your own business let me tell you there is no better feeling; other than making money, than seeing your logo printed in large scale on some sexy vinyl. I went ahead and had them apply it because I am a lot of things, a vinyl guy I am not.
From this point on it became butt-puckering kind of difficult because I had to put the blood spatter on. So I got an eye dropper and filled it with red automotive and got to work. This was what turned out. I went with arterial spray because it tends to be more fatal. =D


That's pretty much all of it. It is being clear-coated as we speak and it will be on the bike as soon as I can manage to get it done. Hopefully next week will be the Egg part two.
Friday, May 14, 2010
THE EGG!!!!! Part 1 of 2

I have a huge obsession for the peripheral and abnormal props and scenery that you see in video games. I have always wanted a lawgiver or the mask from the old Shinobi games. One thing in particular that I really wanted was one of the eggs from Super Mario Brothers.


As luck would have it there were none that I felt would do the game justice so I decided it was time to act. I ran to my cave and grabbed one of my left over chunks of foam. It literally took me ten minutes to carve and sand the bead foam to a relative shape. Logically the next question is; what to make it out of? Then it hit me; I could cast them in bead foam so that they would be squishy and you could launch them at your friends without causing a major head injury....well not intentionally anyway. However there was a flaw with this theory in the fact that I would have to find a way to make this egg as organic as possible because I wanted it to look "real" (aside; yes I know its from a game thus fictional but I can dream can't I?!!!) This meant that I would have to glass the foam first but fiberglass resin eats bead foam. Dammit! Then it hit me.
 That's right, paper mache! I wasn't about to risk having to copy the egg again because cleaning up bead foam is a pain in the ass. I surmised that if I covered the egg in paper mache and then covered that in glue ; I would stand a better chance of having a complete egg as opposed to a gooey chemical mess on my shop table.
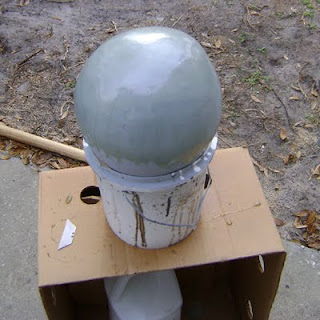 Above you can see that I used no mat for this process. I needed it to be smooth, not double as a Howitzer round. I painted three coats of glass onto the egg and primed them using simple automotive primer. Once the glass was dry I sanded it smooth and re-glassed thin spots. then re-primed it and painted it again.
 Once I was satisfied that it was mostly smooth I used auto-body filler to fill in small imperfections. This is because Silicon, at least the stuff I use, will pickup detail as small as a fingerprint. So, once it was satisfactorily smooth I went to the next phase which was.......
 Molding time! Above you can see the key and zipper system I use. I was running short on Klean Klay so I just did one row of each. Next it was time to mold this puppy and for that I always use mold max 30 from reynolds. It has an awesome pot life and the detail is amazing!

 I coated the egg with three coats of silicon per side. In hindsight I wish I had done more but my mold still works. Currently I am working the kinks out of my process and I have begun casting eggs. That's a story for next week though......To be continued!
 That's right, paper mache! I wasn't about to risk having to copy the egg again because cleaning up bead foam is a pain in the ass. I surmised that if I covered the egg in paper mache and then covered that in glue ; I would stand a better chance of having a complete egg as opposed to a gooey chemical mess on my shop table.
 Above you can see that I used no mat for this process. I needed it to be smooth, not double as a Howitzer round. I painted three coats of glass onto the egg and primed them using simple automotive primer. Once the glass was dry I sanded it smooth and re-glassed thin spots. then re-primed it and painted it again.
 Once I was satisfied that it was mostly smooth I used auto-body filler to fill in small imperfections. This is because Silicon, at least the stuff I use, will pickup detail as small as a fingerprint. So, once it was satisfactorily smooth I went to the next phase which was.......
 Molding time! Above you can see the key and zipper system I use. I was running short on Klean Klay so I just did one row of each. Next it was time to mold this puppy and for that I always use mold max 30 from reynolds. It has an awesome pot life and the detail is amazing!
 I coated the egg with three coats of silicon per side. In hindsight I wish I had done more but my mold still works. Currently I am working the kinks out of my process and I have begun casting eggs. That's a story for next week though......To be continued!
Subscribe to:
Posts (Atom)


