Saturday, September 4, 2010
NEW WEBSITE AND NEW STORE!!!!!!
Ok everyone. As promised I have been really hard at work doing my usual research and development and the fruits of my labors have been BORN!!!! BEHOLD! http://www.darkproductionsllc.com has risen from the ashes to bring you the finest pieces I have created to date. But wait there is more......we are up and running on Etsy.com as well. The site is http://www.etsy.com/shop/DarkProductionsLLC. Come shop and see what we have to offer!
Tuesday, July 13, 2010
No I am not dead
Good afternoon,
Rumors of my death have been greatly exaggerated. Currently I am in the process of working up some new content for my website PLUS some of my previously hands off stuff has become un-classified so new content up soon.
~Newsome
Saturday, June 12, 2010
Things to come
I gave a speech a few days ago to a high school stagecraft class. It was a unique experience as I don't normally speak to large groups. Anyway, as most of you know I have a back injury so the updates have been a little spotty at best BUT i am cleared to work some now so I am planning the website and beginning the BUSTER!!!! I can't wait because I have figured out ways to make it electronic as well as animated. If my plan works out I should be able to make it vibrate (charging), pop up heat vents, and light up. It will be a few weeks but I will try and keep everyone posted.
~Newsome
Friday, June 4, 2010
OH yea this is SOOOOO SEXY!!!!
So I know I have been out for a while with the back thing and just today I found that I am going to have to do EVEN more but I had to do something today so I put one of the last finishing touches on NIMH. Yes I named the bike and to hell with you if you don't like it. My next treatment is gonna be a Light bike motif to honor the new upcoming TRON movie.

This is the front of him so far. The shield is going to be repainted due to personal belief changes.

This is his side and believe me it looks and feels just as sexy as the picture. Last but not least; two things. Here is the tank detail----

ANNNNDDDDD..... I am in the process of switching insurance companies because my current one sucks. I was attempting to get the bike on the same insurance as my house, truck, car, etc... so my policy and payment would be lower and I found out that I own one of the top FIVE bikes that insurance companies hate to insure because of the types of people who own them! That is amazing and awesome as well as expensive but ah well.......totally worth it.
Friday, May 28, 2010
Sorry
Post will be updated tomorrow as I have just gotten done with PT and have an urgent meeting to attend to.
Friday, May 21, 2010
THE TANK OF DOOOM!!!
This is not, in fact, The egg part two as I promised because in between then and now I have managed to end up in physical therapy. Thus I defaulted to my ongoing project which was my website and getting advertising so that I can bring my evil creations to the masses (insert evil laugh here!)
This brings me to the topic of turning my bike (Cbr 954) into my own two wheeled advertising whore. This is what he/she/whatever looked like when I bought it.

After a really nasty wreck about a year ago it ended up with about $4000.00 in damage to the fairings (the plastic stuff for those of you that don't ride) and a hefty E.R. bill for me because I wasn't wearing a lid. I know I know I am an idiot shut up! This was what it looked like when it returned to the shop.

Anyway after re-habbing and avoiding it for two months I finally decided to resurrect N.I.M.H (Yes I named it and it stands for the National Institute for Mental Health which is where I should be because I have done 185 M.P.H on it........allegedly. ) Resurrecting meant painting it because I only had enough cash to repair the major working and not the facia. So three tube of Epoxy and A LOT of Bond-o later I decided to paint it my style which meant......blood-stained and black....LIKE MY SOUL AHAHAHAHAHAHAH! Which promptly made it look like this.

This made me so happy and was incredibly easy to paint. Fabricator point of order.....buy sherwin williams automotive. They have come out with some amazing low V.O.C stuff for automotive paint and it is amazing. I bought PPG originally and the black base coat cost me 80 bucks. It promptly cracked and ran like a scalded ape all over the fairings. I bought the S&W stuff and it cost me 6o for red, white, black, and blue. It went on and I still have some left over.
Currently I decided to put my Dark Productions Logo on the bike so that people will know who did it so what better place to put it than.......THE TANK!!! Thus I primed it.

Once I primed with standard rattle can primer from Lowes. I automotived it to a sexy black. WARNING: Automotive paint is some really nasty stuff so if you decide to use the stuff please please please wear a respirator! This is how the black turned out.

From there I had to design the logo for Dark Productions and send it off to Fastsigns to get it printed in vinyl.

For those of you who are thinking about starting your own business let me tell you there is no better feeling; other than making money, than seeing your logo printed in large scale on some sexy vinyl. I went ahead and had them apply it because I am a lot of things, a vinyl guy I am not.
From this point on it became butt-puckering kind of difficult because I had to put the blood spatter on. So I got an eye dropper and filled it with red automotive and got to work. This was what turned out. I went with arterial spray because it tends to be more fatal. =D


That's pretty much all of it. It is being clear-coated as we speak and it will be on the bike as soon as I can manage to get it done. Hopefully next week will be the Egg part two.
Friday, May 14, 2010
THE EGG!!!!! Part 1 of 2

I have a huge obsession for the peripheral and abnormal props and scenery that you see in video games. I have always wanted a lawgiver or the mask from the old Shinobi games. One thing in particular that I really wanted was one of the eggs from Super Mario Brothers.


As luck would have it there were none that I felt would do the game justice so I decided it was time to act. I ran to my cave and grabbed one of my left over chunks of foam. It literally took me ten minutes to carve and sand the bead foam to a relative shape. Logically the next question is; what to make it out of? Then it hit me; I could cast them in bead foam so that they would be squishy and you could launch them at your friends without causing a major head injury....well not intentionally anyway. However there was a flaw with this theory in the fact that I would have to find a way to make this egg as organic as possible because I wanted it to look "real" (aside; yes I know its from a game thus fictional but I can dream can't I?!!!) This meant that I would have to glass the foam first but fiberglass resin eats bead foam. Dammit! Then it hit me.
 That's right, paper mache! I wasn't about to risk having to copy the egg again because cleaning up bead foam is a pain in the ass. I surmised that if I covered the egg in paper mache and then covered that in glue ; I would stand a better chance of having a complete egg as opposed to a gooey chemical mess on my shop table.
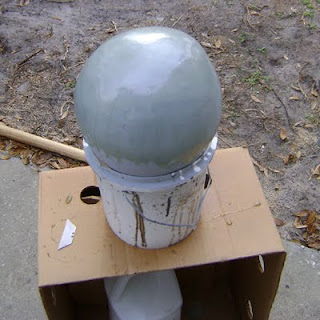 Above you can see that I used no mat for this process. I needed it to be smooth, not double as a Howitzer round. I painted three coats of glass onto the egg and primed them using simple automotive primer. Once the glass was dry I sanded it smooth and re-glassed thin spots. then re-primed it and painted it again.
 Once I was satisfied that it was mostly smooth I used auto-body filler to fill in small imperfections. This is because Silicon, at least the stuff I use, will pickup detail as small as a fingerprint. So, once it was satisfactorily smooth I went to the next phase which was.......
 Molding time! Above you can see the key and zipper system I use. I was running short on Klean Klay so I just did one row of each. Next it was time to mold this puppy and for that I always use mold max 30 from reynolds. It has an awesome pot life and the detail is amazing!

 I coated the egg with three coats of silicon per side. In hindsight I wish I had done more but my mold still works. Currently I am working the kinks out of my process and I have begun casting eggs. That's a story for next week though......To be continued!
 That's right, paper mache! I wasn't about to risk having to copy the egg again because cleaning up bead foam is a pain in the ass. I surmised that if I covered the egg in paper mache and then covered that in glue ; I would stand a better chance of having a complete egg as opposed to a gooey chemical mess on my shop table.
 Above you can see that I used no mat for this process. I needed it to be smooth, not double as a Howitzer round. I painted three coats of glass onto the egg and primed them using simple automotive primer. Once the glass was dry I sanded it smooth and re-glassed thin spots. then re-primed it and painted it again.
 Once I was satisfied that it was mostly smooth I used auto-body filler to fill in small imperfections. This is because Silicon, at least the stuff I use, will pickup detail as small as a fingerprint. So, once it was satisfactorily smooth I went to the next phase which was.......
 Molding time! Above you can see the key and zipper system I use. I was running short on Klean Klay so I just did one row of each. Next it was time to mold this puppy and for that I always use mold max 30 from reynolds. It has an awesome pot life and the detail is amazing!
 I coated the egg with three coats of silicon per side. In hindsight I wish I had done more but my mold still works. Currently I am working the kinks out of my process and I have begun casting eggs. That's a story for next week though......To be continued!
Thursday, May 6, 2010
THE COMPANION CUBE!!!
Step 1: don't suck.
Portal Companion Cube
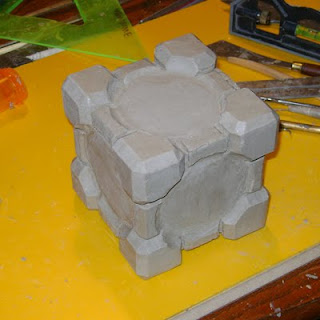
The Portal companion cube started like most of my other projects: with sculpting. At the time that this blog was written, I did mainly clay sculpture. Since then I have branched out into other fields of sculpture, but for the sake of simplicity, we're going to go with "It started off as clay." One of the hardest things to do when sculpting is sculpting machined edges. the Portal companion cube was no exception, because it was all machined edges. What can I say? I'm a masochist.

Basic shape was easy. I used a toothpick as a depth gauge, which came to me after many hours of cursing and trying to figure out how to level out clay that didn't want to agree with me on one side and agreed with me too much on the other. I used a Sharpie marker to mark the depth that I wanted, um, and made sure that the clay was a uniform depth on all sides. This is when another difficulty began, because you have to have a uniform way to scrape the clay. I used a common speed square to give myself a flat edge and to measure up on the other edges.
Next came the detail - more cursing ensued. the Portal Companion Cube, as I said before, is full of machined edges. That meant that the circles on all the facets of the cube had to be uniform. Originally, I used a restaurant glass to model the hole. I sighted where the hole needed to be, used a torch to heat up the clay, and then pressed in the cup. My long-patient girlfriend completely refrained from accusing me of trying to burn the house down. And by completely refrained, I mean definitely did NOT cackle about it like a stoned jackal, under any circumstances at all. From there, the job got a little less stressful (hah hah) in that I could just take the scraper and carve out the recess. I say less stressful, kind of like a root canal is less stressful than having your jaw removed, because at time I ended up getting a little overzealous with my scraper, and carving all the way down to the block. which I then had to re-heat, refill, re-scrape, and re-level. Oh, goody.
I finally got all six circles finished, with most of my hair still attached to my head (that's a lie. - ed.) and proceeded to survey my handiwork. It *looked* level. By rights it must *be* level, right? This is a lie. A vicious and untrue lie. Because they weren't level. Not anywhere close. Not even in my fondest dreams could they have been level. From there I started working on the edges. I roughed out my main corner pieces, and roughed out the centers. From there, it just seemed simple that I would have to miter the corners, and move on. This, too, was a lie. A vicious and untrue lie told to me by my own brain in order to lull me into a false sense of success. Thus came version 2.0, because everything I undertake has to be at least near perfect.
Verson 2.0 started off a lot easier because I realized it was much easier to machine a wooden block that I had already prebuilt than it was to machine clay. I set the router table up and proceeded to rout the groves down all six facets.
 (Side note: this cube was originally slated to be a lament configuration from Hellraiser. No worries though it will happen.)
Here you can see that the lines are machined straight because I grew a frontal lobe and use the tools I had at my disposal.
Next came the corner pieces and these were much faster than sculpting a whole cube at once so it took me no time to reach my molding phase and the silicon usage was minimal.

This done, all I had to do was wait eight hours and I had these. (see below)

The left hand side is the major corner piece and the right is the middle between each corner. Now to finish the beast so that I could have my very own companion cube and take it to Mega-con with me. I poured eight of the corners and twelve of the centers. Sanded them, primed and painted, and this is the final product as it looked at Mega-con.

This is where it got really cool because there was a girl there dressed as an actual companion cube as we as a Chelle with her own Portal gun.

(Just a reminder, I am taking commission work so if there is something that you would like, please email me at clockworkatrocity@gmail.com)
Next up: Yoshi eggs from Super Mario.
~Newsome
Tuesday, May 4, 2010
Shop Blog Day 1
I've been noticing a rather large rift in the entertainment community in reference to cosplayers. there's a lot of drive to do really good props, but not a lot of decent tech to be able to pull off the props that people want.
Cosplayers tend to have a lot of drive matched with not a lot of money and the unfortunate part of that equation is that a lot of the mainstream prop shops charge an arm and a leg for not much.
I started Dark Productions because of that fact and because I wanted people to be able to have decent quality props without spending a ridiculous amount of money. But where to start? Because in any props job, you have to understand what your client is looking for. If you can find what they want without ripping them off, then people end up respecting you. And out of that respect people will start to respond to your work. So, being one for shameless self-promotion, I decided to start off my company building the Portal companion cubes from the Valve game Portal. It is a 5"x5" cube made out of paintable resin and cast out of a silicone mold. This is important because it keeps my production costs low, which means my customer's value is my primary concern. This is causes a lot of prop shops problems, because they make custom orders, which is where you run into ridiculous amounts of money. Dark Productions does custom work, but at the same time, we also sell a lot of quantity production video game props. For the consumer this means that we can keep costs low while at the same time giving them the highest quality product available.
Subscribe to:
Comments (Atom)


